Korea OpenBuilds 커뮤니티에 오신 것을 환영합니다.

회원의 나머지 부분에 참여를 원하시는분은 가입해 주시기 바랍니다.

회원 가입 (Sign Up)

세모 3D 프린터 (Deltabot 3D Printer)들

분류 : '3D 프린터' 주제글 시작 deltapenguin, Mar 22, 2016.
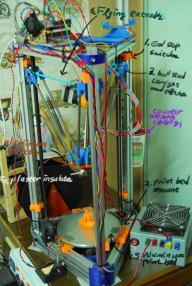
  1. deltapenguin

    deltapenguin New Member

    가입일:
    Mar 22, 2016
    게시글:
    6
    좋아요:
    6
    deltapenguin published a new article:

    Read more about this article...
     
    #1
    Last edited by a moderator: Mar 23, 2016
    kiminhan likes this.
  2. kiminhan

    Staff Member

    가입일:
    Nov 6, 2014
    게시글:
    618
    좋아요:
    252
    good builds^^ :)

    좋은 작품기대됩니다.
    오픈빌드 환영합니다
     
    #2
  3. deltapenguin

    deltapenguin New Member

    가입일:
    Mar 22, 2016
    게시글:
    6
    좋아요:
    6
    Reprap 3D 프린터를 만들고 나서 기계가 정상적으로 동작해 모델을 잘 찍기 시작하면
    오차를 0.1 mm 근처로 줄이기 위한 몇가지 값맞추기 (calibration) 작업을 해야 합니다.

    열끝 (Hotend)의 온도 센서가 실제 온도를 정확히 측정하는지 K-type 온도센서 (thermocouple) 기능을 지원하는 멀티미터나 온도 측정기로 열끝의 열 통 (heater block) 온도를 재서 비교를 합니다.
    (3D 프린터 제어 프로그램은 Pronterface로 사용 예)

    [​IMG]

    온도 측정기로 잰 온도와 Pronterface에서 보여주는 온도가 거의 비슷하면 온도 조절하는 PID 변수 값 맞추기를 합니다.

    http://reprap.org/wiki/PID_Tuning

    PID 자동 값맙추기 명령어는 M303. 실행 예는
    M303 E0 S200 C8
    E0는 뽑개 (extruder) 이름 (보통 열끝이 하나이면 E0임)
    S200는 200도
    C8은 온도 측정 횟수를 8번

    위 명령어는 200도 까지 8번 온도를 올리면서 PID 온도 조정 알고리듬이 쓰는 세 변수 값, P, I, D를 구해줍니다.

    bias: 92 d: 92 min: 196.56 max: 203.75
    Ku: 32.59 Tu: 54.92
    Clasic PID
    Kp: 19.56
    Ki: 0.71
    Kd: 134.26
    PID Autotune finished ! Place the Kp, Ki and Kd constants in the configuration.h

    Marlin 펌웨어를 빌드할 때 EEPROM에 변수값 저장 기능을 넣었다면
    M301 P19.56 I0.71 D134.26 으로 PID 변수값을 바꾼 다음 M500으로 EEPROM에 저장합니다.

    그 다음은 작업은 인쇄 질에 가장 큰 영향을 주는 오무림 (retraction)을 처리하는 뽑개 스테퍼 모터의 스텝 수 (E number)를 간단한 값맞추기 모델을 여러번 찍어가면서 적정 사출량 (flow rate)을 찾습니다.

    가장 일반적인 방법은 아래처럼 사각 기둥을 벽 두께를 하나로 슬라이서 프로그램에 정하고 모델의 벽 두께를 0.01 mm 단위까지 재는 마이크로미터나 캘리퍼로 잽니다. 그리고 너무 두꺼우면 슬라이서 프로그램에서 extrusion multiplier를 (기본 값은 1.0) 줄이고, 너무 얇으면 늘려줍니다.

    [​IMG]

    Slic3r에서 사출 두께 정하기
    (https://solidoodletips.wordpress.com/2012/08/16/setting-the-flow-rate/)
    아래에서 사출 두께는 0.42 mm임.

    [​IMG]

    찍은 모델 벽 두께가 0.51 mm로 나왔다면
    0.51 * x = 0.42 로 곱셈값 (multiplier) 0.82를 찾아 Slic3r에서 기본값 1.0을 0.82로 바꾸고
    gcode를 만들고 다시 모델을 찍습니다.

    이 곱셈값 구하는 과정을 몇번 반복해서 아래 처럼 슬라이서에서 지정한 사출 두께와
    측정값 차이가 거의 똑같아지면 슬라이서에 기본 곱셈값으로 저장하고 작업을 끝냅니다.
    [​IMG]

    위 방법보다 더 세밀한 사출량을 조정하고 싶으면
    E 스텝 정밀 값맞추기를 합니다. 사용하는 Gcode 명령어는 말린에서는 M92로
    현재 내 펌웨어의 E 스텝 값들은 X100.00 Y100.00 Z100.00 E450.67 인데,
    여기서 E450.67이 뽑개의 스테퍼 모터 E 숫자입니다.

    아래 방법은 링크에 나온 모델을 찍으면서 사출량을 0.5% 단위로 늘이거나 줄여가며
    최적 E 스텝 값을 찾습니다.

    진한 왼쪽 네모는 100% 채움, 오른 쪽 네모는 95% 채움.
    [​IMG]

    (http://reprap.org/wiki/Triffid_Hunter's_Calibration_Guide#Layer_height.2C_Extrusion_width)
    E Steps Fine Tuning
    Now, with everything very close to ideal values, we can finally dial E steps in that final little bit!

    1. Find an object with flat tops on a number of levels, such as this cube stack test (scale this object by 250% after loading in Slic3r)
    2. Slice at 95% rectilinear infill. Use the lowest layer height you're comfortable with - the lower the layer height used for this test, the finer your resulting E steps calibration will be. I use 0.2mm for first run, and if I'm feeling ambitious I'll repeat this process at 0.1mm.
    3. Print.
    4. Ignore the first 5-6 layers because they're too sensitive to the exact height of the first layer. If it's obviously over-filling or under-filling, alter E steps or Z=0 point and restart the print.
    5. Observe infill. If you can't see tiny little gaps between the lines, reduce E steps by 0.5% every 2 layers until you can see tiny gaps.
    6. Observe solid top layers. If you can see tiny gaps, increase E steps by 0.5% every 2 layers until there's no gaps in the top.
    7. Send the new E steps to your printer with M92 Ennn without even pausing the print - you will see the result in a couple of layers when the change is this small.
    8. Goto 5 until the infill has tiny gaps AND the solid top layers do not.
    9. Now, your E steps value is extremely fine-tuned! Save this value in your firmware's configuration and flash to make permanent.
     
    #3
    kiminhan likes this.
  4. kiminhan

    Staff Member

    가입일:
    Nov 6, 2014
    게시글:
    618
    좋아요:
    252
    좋은정보입니다.
    스레드 이쪽으로 병합했습니다.
    goodjob:););)
     
    #4

현재 페이지 공유